There is no right or wrong order to set up a rat cage really it’s totally personal preference and what works well for you. However there are good orders in which to put things in efficiently which will minimise you having to shift things about to get things to fit and make sure routes are all connected.
Obviously this is a thing that at the start of rat keeping can be very overwhelming and even quite stressful but the more you do full cage changes the easier it will get. It’s best to do a cage rearrange every couple of months it’s said to keep things interesting for the rats but at the very minimum we usually make sure we totally change things up every time we strip the cage down to do intros.
So below I’ve put together a little picture guide on my preferred order of how to put a cage setup together from start to finish. It contains pictures of each step, clear marked arrows showing you where the items were put and a brief explanation of why each stage is what it is.
Stage 1 – Substrate
Choose your recommended substrate and put a nice deep layer down at the bottom of the cage. If you can get a perspex base made to put in the cage to make an even deeper digging setup then that’s even better.

** Please note this guide was done on 2 tiers of a 3 tier Little Zoo so don’t worry about the shallow substrate on the bottom. That’s not the actual bottom it’s just extra floor space and a divider to the lower level. The lads were sectioned off down there while we built the top half of their cage **
Stage 2 – Large/Fixed Items
Put in the big stuff first. These are things like big litter trays and wheels. Basically fixed position items that can’t be moved or are so large moving them at the end will mean moving multiple items around to get them to fit so in this case fixed shelves we use as litter trays and the 16″ TicTac Wheel.

Stage 3 – Fall Breakers
These are your main larger fall breakers that cover a bigger area. Obviously all soft things like your hammocks and ropes will also act as fall breakers too these larger ones are to cover the most area possible and need staggering vertically and horizontally to full maximise the space they cover. The aim is to have all areas of the cage covered so the rats can’t fall too far without hitting something soft. Putting these in early and having a look from the top is very beneficial as you can check off that most fall space is covered already. This means that when you fill in with hammocks and ropes later on this will only further reduce fall space making it even safer for them. Great examples of these are the Large Cargo Nets made by Mischief Made, the Rope Net Fall breakers from Ratatat Toys & Things and Larger flat hammocks made by places like Cosybedsandburrows and RattieAngels. Zoe’s Creature Comfort’s even make full sized cage fall breakers out of fleece with several access holes meaning you can cover an entire layer of your cage with one giant fall breaker.

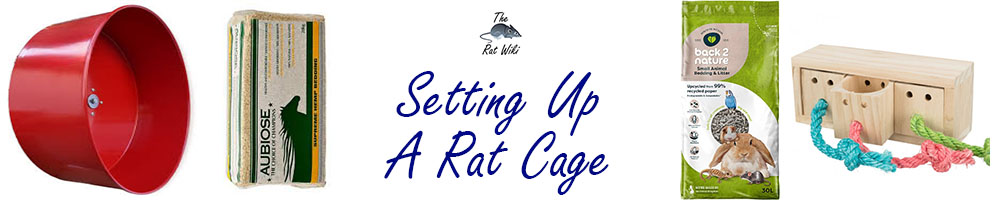
Stage 4 – Hammocks
Next up is hammocks. Placement is completely your choice but we like to have a main area at the top with mostly hammocks as rats tend to feel safer higher up. So we place the larger, more communal hammocks high where they can all huddle in together and then give a few choices lower down. Our group is mostly a younger mix at the minute after losing our older rats sooner than expected so we’re aiming for a more active setup this time with less hammocks and more stuff to do so if you want to put a few more in than I do, especially for the older rats lower down the cage) then that’s still fine. The main places I get hammocks from which you’ll see in these pictures are Cosybedsandburrows, Fuzzbutt Cage Comforts and RattieAngels but there are plenty of other great choices if you look on the shops and vendors section of the wiki we are spoiled with great hammock makers.
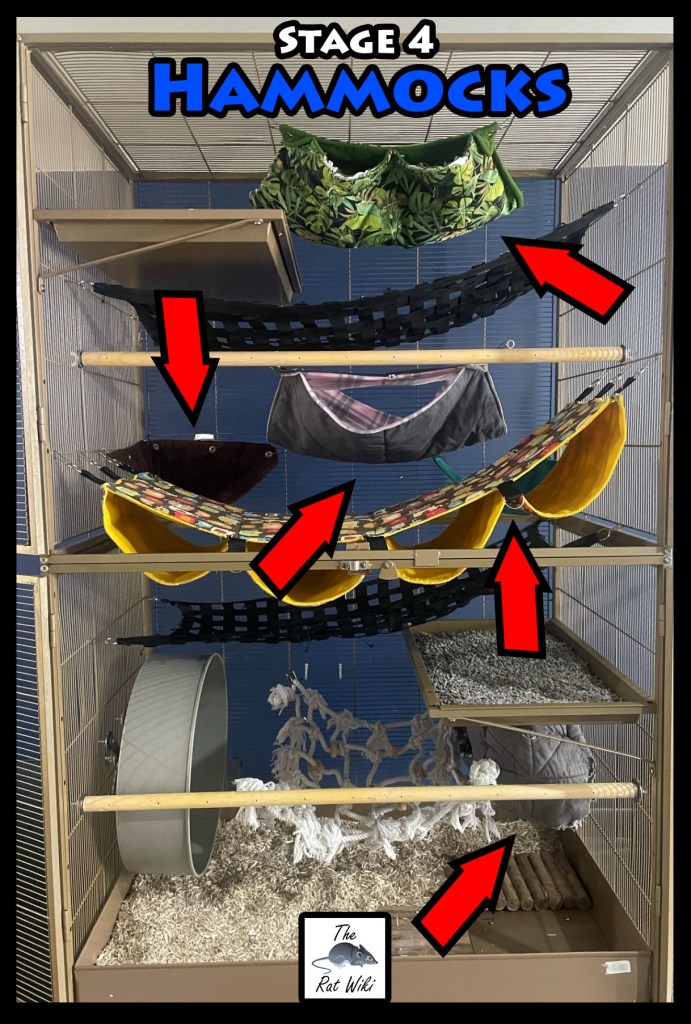
Stage 5 – Perches
Perches are up next. You want to strategically place these around the cage to help the rats get around without doing everything for them. You want to place them in a way that will give them different “routes” around the cage so placing one down then thinking where can they get to from here so I can place another one down. Rats can jump, climb, balance and leap incredibly well so (especially for young and fit adult rats) you want to be encouraging this behaviour with what you put in the cage to not only keep them active but enriched too by making things fun for them. We also like to put perches near the entrances to hammocks too as lazy bucks can be quite clumsy when getting in and out so like to give them a helping hand with ours. Great places to get perches from which we use are Pet Ledges UK, RockWing and Tiny Furry Pet Stop.
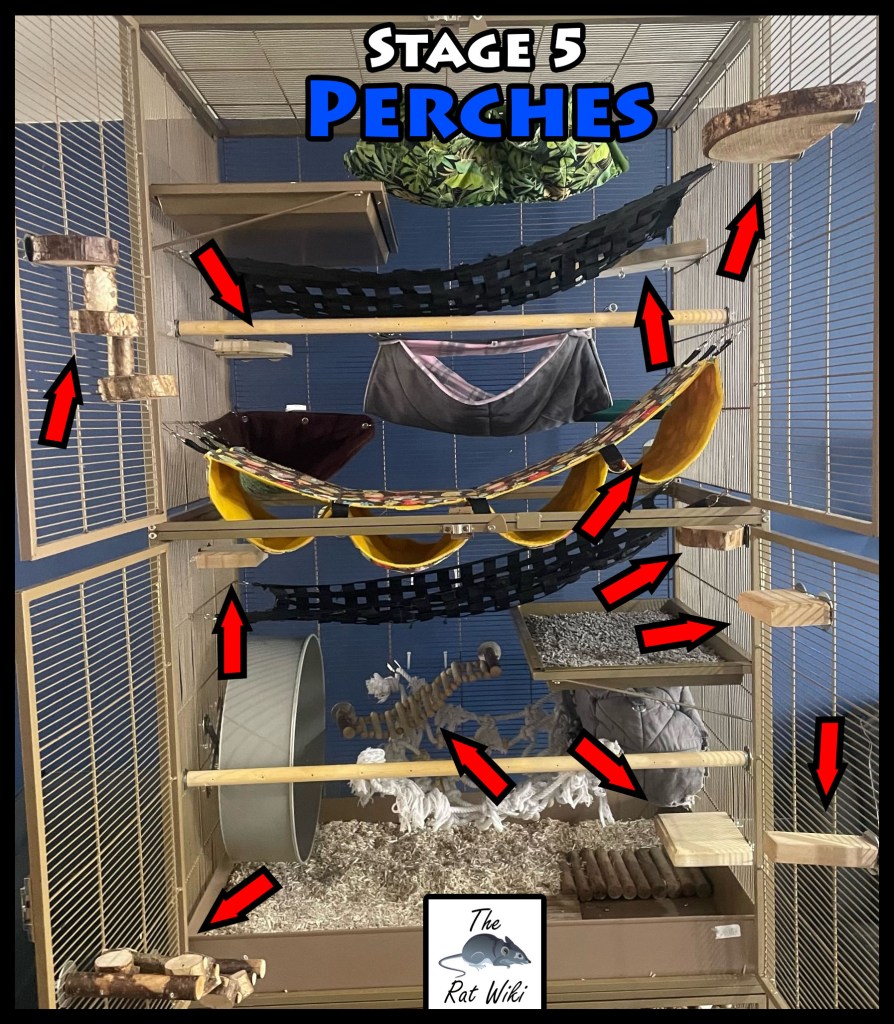
Stage 6 – Toys and Enrichment Items
Next up is larger toys and enrichment items. Again we tend to find any bigger gaps that haven’t been filled yet to take up some of that space but also not to just put these items somewhere they can’t get to easily as with a lot of enrichment items it helps that they can stand next to these items to interact with them. Placing them near perches and hammocks therefore is a good idea but don’t make it too easy for them. Having to stretch or balance a little is a further fun challenge for them so don’t be afraid to make them work for things a little bit they secretly enjoy it. Great places for toys and boredom breakers like this are Bayo’s Bunting Balls, Critter Happy Homes, Heart Rat Creations, Scarletts Rat Essentials and The Rat Warehouse.
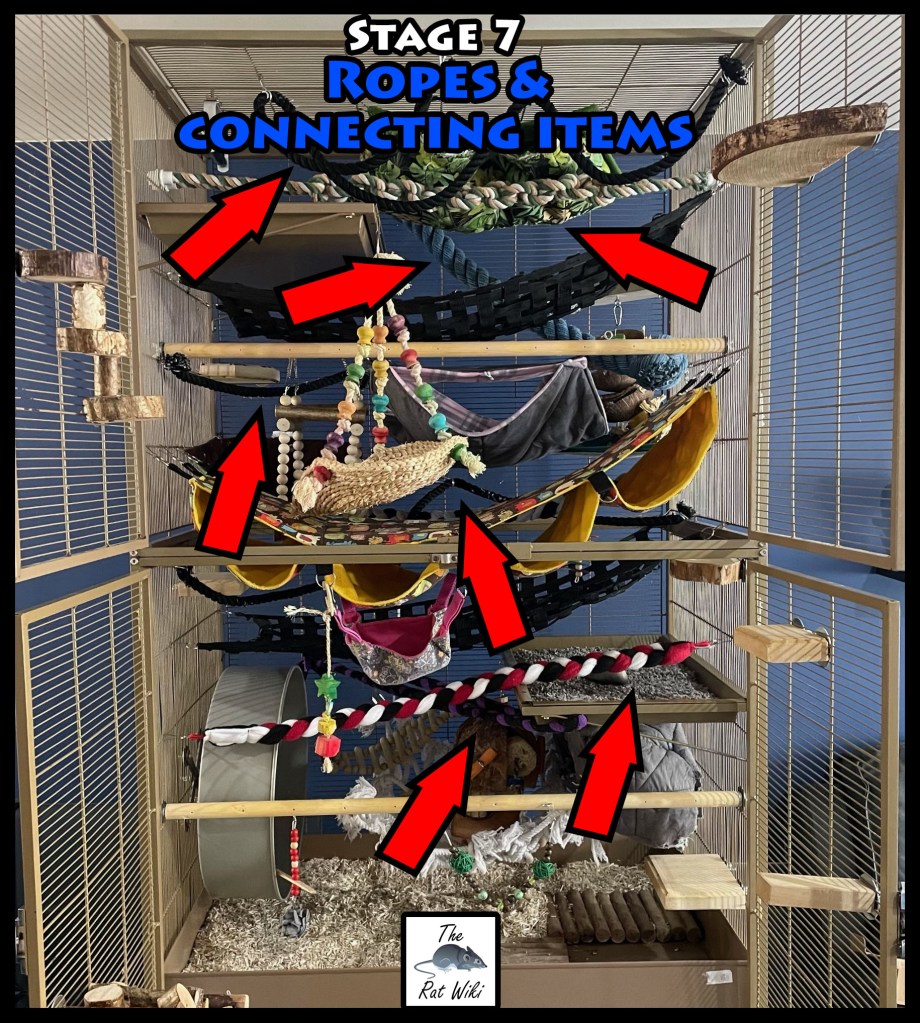
Stage 7 – Ropes and Connecting Items
One of the final stages is to connect various different areas together. This is mainly done by things like ropes and smaller nets and flexible walkways. Basically ways you can fill other gaps in the cage whilst also creating fun little shortcuts for them to climb, balance and jump from. Again try not to make things too easy for them it’s always best to create good opportunities to get to different places around their cage but make them work for it. Rats get bored very easily so giving them a challenge keeps them happy and also fit and healthy. Great places to get some good hand made ropes are Rattie Angels. Ratto’s Lassos and Heart Rat Creations
Stage 8 – Ground items
The final thing we do is put in the ground items. You don’t want massively bulky things down here as having plenty of floor space is important for them so what you do put down needs to be on the smaller side or be hollow inside (tubes/hides and houses etc) We like things at the bottom like small animal “Cottages” as they can run around and lay inside it without losing too much floor space. Same with things like tunnels too plus these can be slightly submerged into the substrate so they can have fun digging down to a secret hiding area.

There you have it. This is how we set up our cage usually and we find it works best to do it in this order. How do you guys do yours is it roughly similar to this? Anyone got any tips or tricks that can make things even easier for new owners to set up their cages?
Please note suggestions of where to get certain things mentioned above are examples of some specific stand out items that I personally own. There are many other businesses that offer multiple things as examples above so please also check them out as it’s always great to support as many small businesses as possible.
